Remote JMX Connection example using JConsole
The process of remote JMX connection is quite different from the local JMX connection. There are 4 ways in which you can do JConsole remote monitoring.
- SSL and authentication both disabled.
- SSL enabled and authentication disabled.
- Authentication enabled and SSL disabled.
- Both SSL and authentication enabled.
Each way of remote connection has its own advantages and disadvantages. You can choose the appropriate way based on the ease with which you want to connect and how secure you want your connection to be. In this tutorial, we will study all the 4 different types of JMX remote connection examples and the pros and cons of each. We will also learn how to connect JConsole to Tomcat, JBoss etc in subsequent tutorials.
What is JMX RMI Port and is there any default port?
The JMX RMI port is the port number on which the Java process that you want to monitor listens for incoming connections from the client (Remote management applications) such as JConsole. For monitoring a local Java process, there is no need to specify the JMX RMI port number. But for monitoring a remote process, you need to assign an RMI port number to your Java application.
There is no default JMX port number due to security and other reasons. If you are starting your application without providing the JMX RMI port number, you will not be able to establish a remote connection because without the port number the JMX agent will not start an RMI connector in your host machine’s JVM.
How do I define the JMX port number?
You have to define the JMX port number by setting the system property “com.sun.management.jmxremote.port”. Be careful not to assign TCP ports that are already in use. If you try to use a port that is already in use, your Java application will fail at startup and throw an ExportException. For development purpose you can pick any port between 49152-65535, as these ports are safer compared to the reserved ports.
For the production environment, be careful to pick up a port between 49152-65535. These ports can be dynamically assigned by the OS to running programs based on their availability. If your application is stopped for a while and in the mean time the JMX port number is assigned to some other service by the OS. Your application will not start at all until the client changes the port number or the port is freed by the current application that is using it.
JConsole – Connect to remote JMX Agent without authentication and SSL.
This is the easiest way but also the least safe method to establish a remote JMX connection. You should use this type of connection when you are in the development phase or monitoring your application over a private network. You need to set the following 4 properties to establish the remote JMX Connection.
1. com.sun.management.jmxremote.ssl – The default value is true, which enables Secure Socket Layer (SSL) communication between the client and the JMX agent. We will set the value to false to disable SSL for this example.
2. com.sun.management.jmxremote.authenticate – The default value is true, which enables authentication using username and password. For this example, we will set this to false.
3. com.sun.management.jmxremote.port – As mentioned above, this property is used to set the JMX RMI port for communication.
4. java.rmi.server.hostname – The IP address of the host machine where your Java application is running. This default value is the IP address of the local host. If you only have a single network interface, then you need not set this property. But in case, you have multiple active network adapters. Then you have to specify this value as the Java program can pick IP address of any one of the network adapter.
Starting the Java Application.
We will create a very simple Java program, and try to connect it from a remote machine. The main thread on startup will sleep for 10 minutes.
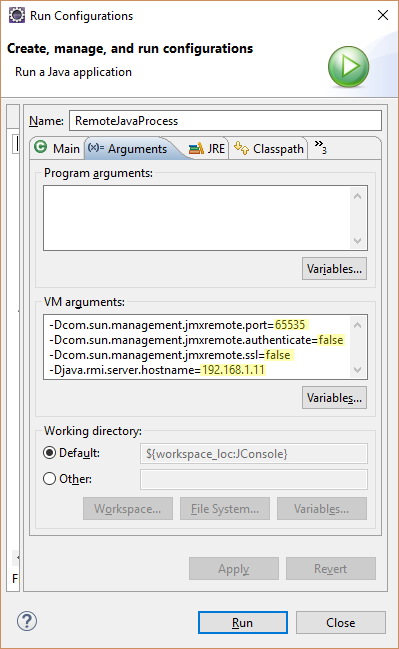
https://gist.github.com/db39365ff75c7e73cfeeca1383f52245For Eclipse IDE, we will add the following arguments in the Run Configuration ->Arguments -> VM Arguments.
“-Dcom.sun.management.jmxremote.port=<Port-No> -Dcom.sun.management.jmxremote.authenticate=false -Dcom.sun.management.jmxremote.ssl=false -Djava.rmi.server.hostname=<IP-Add of Host>” and run the program.
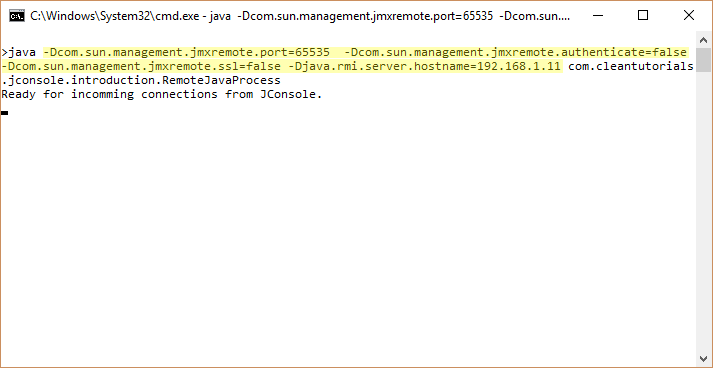
For running the program from command line.
java -Dcom.sun.management.jmxremote.port=<Port-No> -Dcom.sun.management.jmxremote.authenticate=false -Dcom.sun.management.jmxremote.ssl=false -Djava.rmi.server.hostname=<IP-Add of Host> Fully Qualified Class Name.
Starting JConsole.
Open JConsole on the remote machine. Select the remote Process radio button. Enter the IP Adress of the host and the JMX port in the following format. <IP-Add>:<Port Number>.
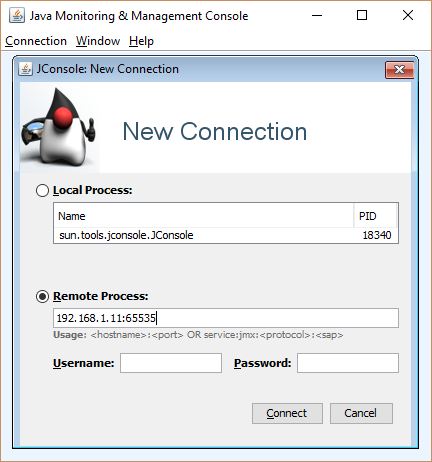
Since we are not using authentication in this remote connection example, you can leave those two fields empty.
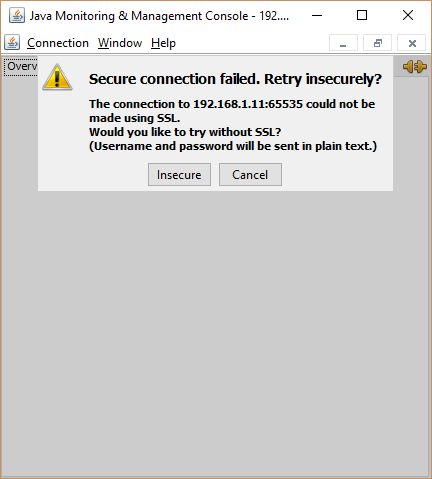
As we disabled the SSL protocol using the system property, we will get the above warning “Secure Connection failed. Try Insecurely”. Click on Insecure to establish the connection.
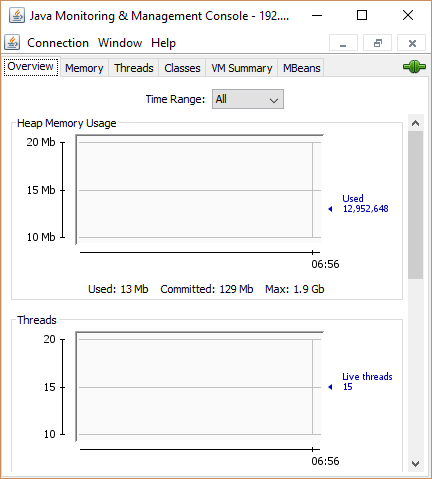
Finally, we are connected to the Host using a remote machine.
JConsole – Connect to remote JMX Agent with authentication.
This method safer than not using any password authentication. The passwords are stored in clear text on the host on which your application is running. Since Secure socket layer (SSL) is not used, an intruder can listen to the non-encrypted communication between the server and client and get the username and password. This is not recommended for production environment.
To enable authentication, you need to create access and password files. The access file contains the username and the role assigned to that user. The two roles are read only and read/write role. These read and read/write role are in relation to the operations that can be performed on the MBeans. With read only role, you can only call a getter method on an attribute of a MBean. But with read/write role, you can perform a set operation on an attribute or invoke an operation defined by the MBean interface. The password file contains the username and its password.
jmxremote.access
| admin readwrite | |
| guest readonly |
Format : User-name <blank> Role“.
jmxremote.password
| admin password1 | |
| guest password2 |
Format : User-name <blank> Password“.
The next step is to make the password file to be restricted to read-only permission to the current user or the user who started the JVM that you want to monitor. If the current user doesn’t have read permission, you will get the following error on application startup – “Error: Password file read access must be restricted”
Windows users can follow the below steps.
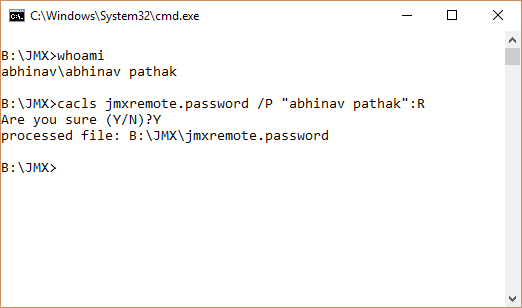
| cacls jmxremote.password /P "Username":R |
Plugin the user name of the current user in the double quotes. “R” means that the username mentioned will get read-only permission to the file. If you don’t know the username, you can use the “whoami” command to find it out as seen below.
Linux users can use the following command.
| chmod 600 jmxremote.password |
Starting the Java Application.
To define the path of the access and the password file we have to set these two properties “com.sun.management.jmxremote.access.file” and “com.sun.management.jmxremote.password.file“. The default location of these files is “JDK Path\jre\lib\management\jmxremote.password” and “JDK Path\jre\lib\management\jmxremote.access”. If you do not specify the above property, then the application will look for these files at the default path.
For Eclipse add the following to the VM properties to run JConsole with authentication.
“-Dcom.sun.management.jmxremote.port=<Port-No> -Dcom.sun.management.jmxremote.ssl=false -Djava.rmi.server.hostname=<IP-Add of Host> -Dcom.sun.management.jmxremote.access.file=<Access file path> -Dcom.sun.management.jmxremote.password.file=<Password file path>”
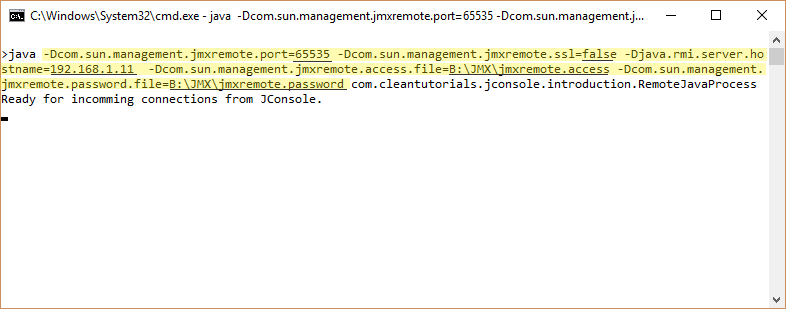
For running the application using command line use the following command.
java -Dcom.sun.management.jmxremote.port=<Port-No> -Dcom.sun.management.jmxremote.ssl=false -Djava.rmi.server.hostname=<IP-Add of Host> -Dcom.sun.management.jmxremote.access.file=<Access file path> -Dcom.sun.management.jmxremote.password.file=<Password file path> Fully Qualified Class Name.
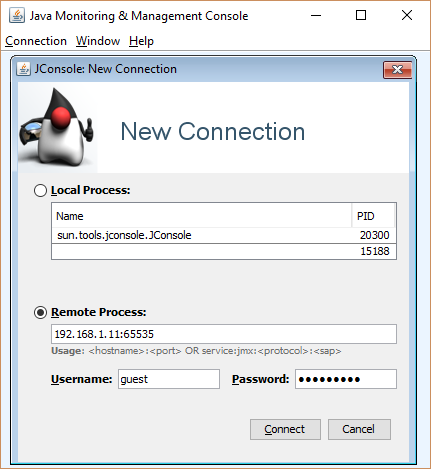
Starting JConsole.
Enter the IP address and the port of the remote host. In the access file, we have specified two different users each with a different role. We will use the “guest” username with “password2” as it’s password.
Since we are only using authentication and no SSL, we will again get the Insecure connection warning after clicking on Connect.
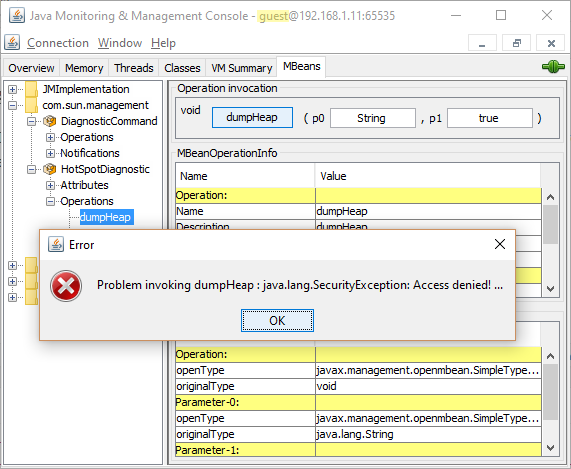
As we logged in with the guest username, we cannot perform any write operations (Set or Invoke) on any resource. If we try to invoke write operation, we will get Security Exception. However, using the admin credentials we can perform these write operations successfully.


