JConsole SSL/TLS with Password Authentication
For the production environment, it is recommended that both Authentication and Encryption using the SSL (Secure Socket Layer) is configured between the JMX Agent and the remote management application, such as JConsole. In the previous tutorial, we discussed how to establish an unencrypted connection between a Java application and a remote JConsole application with password authentication.
What are the advantages of using SSL/TLS for remote JMX connections?
Confidentiality – Since the data passed between the JMX agent and JConsole will be encrypted from both sides, intruders will not be able to decode the communication and understand the message being passed. For instance, if you are using password authentication only without SSL, an intruder can listen to your connection and steal your username and password.
Authentication – The JMX agent (server) and the JConsole (client) will authenticate each other using the public key/certificate which is discussed in later sections. If the client and the server certificate are not present in the TrustStore of server and client respectively, then the session will be terminated at startup. Apart from the password authentication, we are also adding authentication in the form of credentials using certificates making the connection more secure.
Integrity – SSL ensures that the messages from the two parties are unaltered from the source to the destination.
Client and Server authentication in JMX.
You should have an overview of how SSL works to understand how encryption will take place between the JMX agent and JConsole.
Keystore – KeyStore is a file format that can hold two types of entries.
- Key Entry: The key entry contains a private key along with its public key. The public key is used to encrypt the data and the private key decrypts the encrypted data. For instance, when you visit a URL using “https”, the browser uses public key or the certificate to encrypt the data. Whereas the web server uses the private key to decrypt the data from the browser. In Java, this private-public key pair is represented by the javax.net.ssl.keyStore object. We can also simply call it as KeyStore.
- Trusted Certificate Entry: If only the public key is stored in the KeyStore then it is represented by the javax.net.ssl.trustStore object. The purpose of TrustStore is to hold the list of the trusted certificates and allow connections only from these trusted parties. If a party tries to establish a connection whose public key/certificate is not present in the TrustStore then the connection will be refused.
Steps to enable JMX SSL Connection.
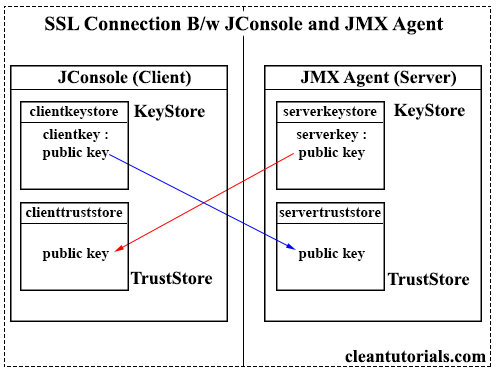
We need to create 2 key entries in the Keystore of the Server (JMX Agent) and the Client (JConsole) machine to enable two-way encryption. The public key associated with the private key of Server will be imported into the TrustStore of the Client and similarly, the public key associated with the client’s private key will be imported to the server’s TrustStore.
keytool is a key and certificate management utility that we will use to create our private keys and certificates. Keytool comes with the standard JDK Distribution. The following example of JConsole SSL connection uses the keyool library from JDK 8.
Step 1: Generate key pair on Server or the Host machine (JMX Agent – Server).
Current Directory (Server): B:\JMX\Security
| B:\JMX\Security>keytool -genkeypair -keystore serverkeystore -alias serverkey -validity 180 -storepass serverpass -keypass serverpass | |
| What is your first and last name? | |
| [Unknown]: JMX Agent | |
| What is the name of your organizational unit? | |
| [Unknown]: DevOps | |
| What is the name of your organization? | |
| [Unknown]: CleanTutorials | |
| What is the name of your City or Locality? | |
| [Unknown]: Delhi | |
| What is the name of your State or Province? | |
| [Unknown]: Delhi | |
| What is the two-letter country code for this unit? | |
| [Unknown]: IN | |
| Is CN=JMX Agent, OU=DevOps, O=CleanTutorials, L=Delhi, ST=Delhi, C=IN correct? | |
| [no]: yes |
Since we are creating a self-signed certificate, after entering the command the tool will ask us about the details of the certificate such as the first and last name. You can fill out random information for development purposes. After filling the information, it will create a “serverkeystore” file in the current directory.
The command-line options and their functions are explained below.
genkeypair: Generates a private key pair along with its public key (certificate). If you are using Java JDK 5 or lower versions, use genkey instead of genkeypair.
keystore: Name of the keystore. A keystore can have multiple keys but for our example, we will only create a single key entry.
alias: The unique case sensitive name of the key entry. Within a keystore, we can only have a single key with the same alias name.
validity: The validity of the certificate. The default validity is 90 days.
storepass: The master password of the keystore.
keypass: The password of a particular key. Different keys can have different passwords. But there can only be a single storepass.
Step 2: Generate the Certificate from the Server’s KeyStore.
| B:\JMX\Security>keytool -exportcert -keystore serverkeystore -alias serverkey -storepass serverpass -file server.cer | |
| Certificate stored in file <server.cer> |
The above command will export the public key from the private key that we created in step 1. The public key will be exported as a certificate named “server.cer”.
exportcert: Exports the public key corresponding to the key name (alias) from the keystore passed in the command. For JDK 5 and lower versions use export instead of exportcert.
file: Export destination and the format of the export file. For instance, we could have imported “.crt” format instead of “.cer” format.
Step 3: Generate key pair on Client or the Remote machine (JConsole – Client).
Current Directory (Client): B:\JMX Client\Security
| B:\JMX Client\Security>keytool -genkeypair -keystore clientkeystore -alias clientkey -validity 180 -storepass clientpass -keypass clientpass | |
| What is your first and last name? | |
| [Unknown]: JConsole | |
| What is the name of your organizational unit? | |
| [Unknown]: DevOps | |
| What is the name of your organization? | |
| [Unknown]: CleanTutorials | |
| What is the name of your City or Locality? | |
| [Unknown]: Delhi | |
| What is the name of your State or Province? | |
| [Unknown]: Delhi | |
| What is the two-letter country code for this unit? | |
| [Unknown]: IN | |
| Is CN=JConsole, OU=DevOps, O=CleanTutorials, L=Delhi, ST=Delhi, C=IN correct? | |
| [no]: yes |
Step 4: Generate the Certificate from the Client’s Keystore.
| B:\JMX Client\Security>keytool -exportcert -keystore clientkeystore -alias clientkey -storepass clientpass -file client.cer | |
| Certificate stored in file <client.cer> |
Step 5: Copy the client certificate to the Server machine and import it in Server’s TrusStore.
| B:\JMX\Security>keytool -importcert -file client.cer -keystore servertruststore -storepass servertrustpass | |
| Owner: CN=JConsole, OU=DevOps, O=CleanTutorials, L=Delhi, ST=Delhi, C=IN | |
| Issuer: CN=JConsole, OU=DevOps, O=CleanTutorials, L=Delhi, ST=Delhi, C=IN | |
| Serial number: 427e283a | |
| Valid from: Tue Sep 05 05:58:57 IST 2017 until: Sun Mar 04 05:58:57 IST 2018 | |
| Certificate fingerprints: | |
| MD5: F0:D9:B2:55:F8:8C:00:88:E5:2D:2C:DD:89:55:79:38 | |
| SHA1: 8D:3E:10:A0:E8:AE:F8:0D:89:CE:6D:2F:78:9B:A6:79:B1:5E:94:F4 | |
| SHA256: 4A:1B:DB:C6:4D:45:46:A1:C5:4E:4F:FD:2C:40:5B:AF:4B:8B:69:47:63:FF:D0:2F:20:06:FB:A0:70:7E:51:E3 | |
| Signature algorithm name: SHA1withDSA | |
| Version: 3 | |
| Extensions: | |
| #1: ObjectId: 2.5.29.14 Criticality=false | |
| SubjectKeyIdentifier [ | |
| KeyIdentifier [ | |
| 0000: 0F 54 27 49 A3 FD B0 FB EE F9 C4 23 97 3A A1 66 .T'I.......#.:.f | |
| 0010: 8B 1B 96 0B .... | |
| ] | |
| ] | |
| Trust this certificate? [no]: yes | |
| Certificate was added to keystore |
Copy the certificate generated on the client machine in Step 4 to the Server machine. For instance, I have copied the client certificate in the following directory: B:\JMX\Security on the server machine.
importcert: It will import the “.cer” file mentioned in the file option to the servertruststore. If you are using JDK 5 or lower versions use import instead of importcert.
Step 6: Copy the server certificate to the Client machine and import it in Client’s TrusStore.
Copy the certificate generated on the server machine in Step 2 to the Client machine. For instance, I have copied the server certificate in the following directory: B:\JMX Client\Security on the client machine.
| B:\JMX Client\Security>keytool -importcert -file server.cer -keystore clienttruststore -storepass clienttrustpass | |
| Owner: CN=JMX Agent, OU=DevOps, O=CleanTutorials, L=Delhi, ST=Delhi, C=IN | |
| Issuer: CN=JMX Agent, OU=DevOps, O=CleanTutorials, L=Delhi, ST=Delhi, C=IN | |
| Serial number: 2eef3295 | |
| Valid from: Tue Sep 05 05:24:54 IST 2017 until: Sun Mar 04 05:24:54 IST 2018 | |
| Certificate fingerprints: | |
| MD5: AF:B2:FC:3D:CF:B0:CB:74:27:80:C3:2B:93:FD:54:EE | |
| SHA1: 1B:54:E7:CB:9E:A4:FD:E3:80:91:7B:BA:15:7F:96:BE:42:B8:1D:DE | |
| SHA256: C7:38:37:FD:56:7F:DB:5F:79:72:22:5C:38:30:10:5B:BC:A3:E3:62:FC:BA:E3:4C:F0:0D:2C:D8:DD:8E:D2:17 | |
| Signature algorithm name: SHA1withDSA | |
| Version: 3 | |
| Extensions: | |
| #1: ObjectId: 2.5.29.14 Criticality=false | |
| SubjectKeyIdentifier [ | |
| KeyIdentifier [ | |
| 0000: 53 DE 89 0D EA CC 08 FA AE 36 4F A1 E1 C3 59 3F S........6O...Y? | |
| 0010: 7E 68 76 4F .hvO | |
| ] | |
| ] | |
| Trust this certificate? [no]: yes | |
| Certificate was added to keystore |
Step 7: Start the Java application.
Add the following options when starting your java application.
java <OPTIONS> class
<OPTIONS>
| -Dcom.sun.management.jmxremote.password.file=<Password-file> | |
| -Dcom.sun.management.jmxremote.access.file=<Access-file> | |
| -Djava.rmi.server.hostname=<host-ip> | |
| -Dcom.sun.management.jmxremote.port=<rmi-port> | |
| -Dcom.sun.management.jmxremote.authenticate=true | |
| -Dcom.sun.management.jmxremote.ssl=true | |
| -Dcom.sun.management.jmxremote.ssl.need.client.auth=true | |
| -Dcom.sun.management.jmxremote.registry.ssl=true | |
| -Djavax.net.ssl.keyStore=<Server-KeyStore-Path> | |
| -Djavax.net.ssl.keyStorePassword=<storepass of KeyStore(server)> | |
| -Djavax.net.ssl.trustStore=<Server-TrustStore-Path> | |
| -Djavax.net.ssl.trustStorePassword=<storepass of TrustStore(server)> |
Using the password authentication files from the previous tutorial and the SSL keystore and truststore files from this tutorial, we will run our Java application using the following options.
| -Dcom.sun.management.jmxremote.password.file=B:\JMX\jmxremote.password | |
| -Dcom.sun.management.jmxremote.access.file=B:\JMX\jmxremote.access | |
| -Djava.rmi.server.hostname=192.168.1.4 | |
| -Dcom.sun.management.jmxremote.port=64355 | |
| -Dcom.sun.management.jmxremote.authenticate=true | |
| -Dcom.sun.management.jmxremote.ssl=true | |
| -Dcom.sun.management.jmxremote.ssl.need.client.auth=true | |
| -Dcom.sun.management.jmxremote.registry.ssl=true | |
| -Djavax.net.ssl.keyStore="B:\JMX\Security\serverkeystore" | |
| -Djavax.net.ssl.keyStorePassword=serverpass | |
| -Djavax.net.ssl.trustStore="B:\JMX\Security\servertruststore" | |
| -Djavax.net.ssl.trustStorePassword=servertrustpass |
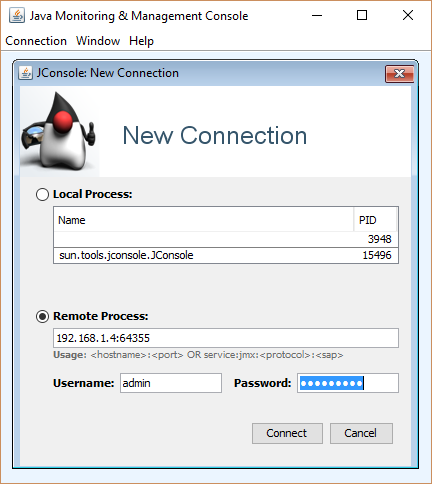
Step 8: Start JConsole.
To Start the JConsole application.
- Open cmd/Terminal
- jconsole <OPTIONS>
- Enter
<OPTIONS>
| -J-Djavax.net.ssl.keyStore=<Client-KeyStore-Path> | |
| -J-Djavax.net.ssl.keyStorePassword=<storepass of KeyStore(Client)> | |
| -J-Djavax.net.ssl.trustStore=<Client-TrustStore-Path> | |
| -J-Djavax.net.ssl.trustStorePassword=<storepass of TrustStore(Client)> |
For instance, for the client keystore and truststore that we created in this tutorial. We will use the following command to start Jconsole.
| jconsole -J-Djavax.net.ssl.keyStore="B:\JMX Client\Security\clientkeystore" | |
| -J-Djavax.net.ssl.keyStorePassword=clientpass | |
| -J-Djavax.net.ssl.trustStore="B:\JMX Client\Security\clienttruststore" | |
| -J-Djavax.net.ssl.trustStorePassword=clienttrustpass |
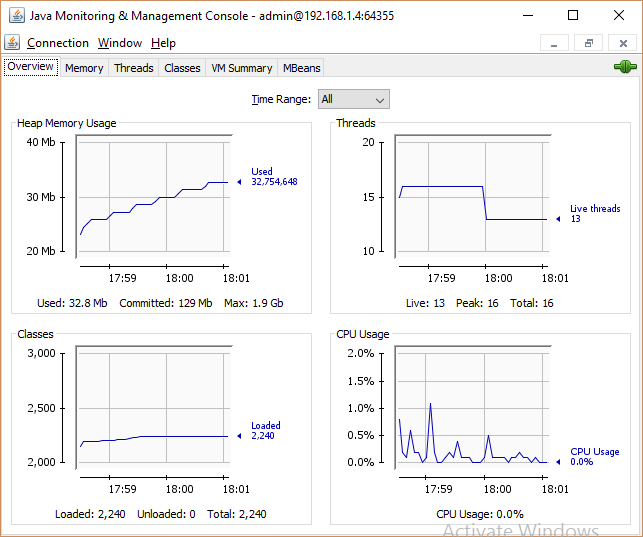
Finally, we have established a secure and encrypted connection between the JMX agent and JConsole using SSL. If you get “Remote Connection Failed Error”. Make sure that the truststore and keystore are configured properly.


